Tuesday, September 29, 2009

Garden Challenges: Strong Winds

Wollongong can be a bit of a windy place, especially at certain times of the year. We're fortunate that we don't tend to be as exposed to the wind as other places due to being on a hill and the backyards on either side of us are higher, giving us a little bit of protection.
However the two days of strong winds last week were certainly exceptional. First was the red dust storm on 23/9 and then the buffetting winds on 26-27/9.

We only suffered one main garden casualty with the winds, which was the snow peas. They simply couldn't hang on to the vegie patch fence with those strong winds. Most of the upper stalks snapped and fell over. I went down to the patch yesterday and trimmed off all the broken stalks. One plant had broken right down to the ground. The other four plants appear to still have some new shoots forming lower down below all the breakage, so I'm hopeful we may still get a bit more life out of them.

Surprisingly, the broccoli seedlings survived, despite no real protection. The young fruit trees also seem to have survived, though the leaves on one of the apples have all wilted and shrivelled, but I think it was doing that before the dust and wind. Hopefully it will come good. And the apple that I had suspected was dead as it showed no sign of life while the other four were growing leaves and flowers, it has a tiny bit of green showing in the top bud.

Sunday, September 20, 2009

Operation Potato Patch

We love spuds, so there was no question that our vegie patch plan would include spuds and lots of them. In anticipation of great mounds of spuds, I eagerly bought a "gourmet combo" of seed potatoes. The pack included six varieties, each with around 8 tubers. The Kipflers and the Nicolas went to Dad as we was keen to give those a go. That left us with the remaining 4 varieties (Desiree, Kind Edward, Royal Blue, and Cranberry Red), or 32 tubers.

Now here is where doing the maths before getting too carried away would have helped. According to a variety of sources, our seed tubers needed to be planted in rows 40-80cm apart with 25-40cm between the spuds along the rows. The packets the seed tubers came in recommended 40cm x 40cm. Now 32 tubers at those spacings meant we were pretty much looking at not only an entire bed, but a bed larger than any of our existing ones. Since we've been thinking about extending the vegie patch down the hill and adding an extra bed anyway, we figured that a no-dig potato patch would be a great way to start.

Preparation and materials
Because gardening in our backyard involves lab-proofing, we needed to figure out what we would use as a barrier around the new patch. The long term plan is that we would use the 2 pool fence panels from the old vegie patch to extend the new vegie patch. However, we're not ready to move those yet so we needed an interim measure. We decided to go with chicken wire.

The no-dig method involves layers of straw, manure, and compost, plus a bit of blood & bone. We already had a good amount of compost and some blood & bone, but needed to buy straw and manure. A trip to Bunnings later and we had 8 bags of pulverised cow manure, 3 bales of sugar cane mulch, and a 10m roll of chicken wire.

Constructing the potato patch
A no-dig patch, as the name suggests, involves no digging. Given our horrible heavy clay soil that is full of rocks, we're a fans of no digging. However, we did need to mow the grass and weeds down, which also served to mark out the area.
While the patch will mostly be a "mound", due to the slope of our yard, we needed something along the lower edge to stop the whole mound slowly sliding down the hill. We re-used some edging from one of the old vegie beds.

To try and keep the kikuyu and weeds at bay around the edges of the bed, we laid down wet newspaper. Unfortunately we didn't have enough to cover all the bits we wanted to, so we will have to add to it later.

The fence was the next thing to go up. The Cunning Plans Dept made some stakes out of branches from the old tea tree and we stretched the chicken wire around the patch, leaving a "gate" at one end.

Next was the layering. Normally with a no-dig patch, you could put the seed potatoes straight on the ground and pile the layers on top. As our ground is hard clay, we figured we'd give our spuds could use a layer between them and the soil.

First we sprinkled a generous amount of gypsum over the ground, which will help break up the clay. Next was a layer of one bale of sugar cane mulch and 4 bags of cow manure mixed up.

The seed potatoes were laid out on this layer, which was ~6-7cm deep. Due to a slight glitch in my mathematical abilities, we had to adjust our layout a bit, but ended up with 3 rows with 9 spuds in each row, with spacing ~40cm x 25cm. I did at least remember to make a note of what we planted where in my garden diary. This, you will note, is only 27 spuds. As it turned out, we only had 30 tubers and I'd previously bought 3 "grow bags", so the leftover 3 spuds went in those.
We then continued with the layers. Sugar cane mulch, then the rest of the cow manure, blood & bone, then more sugar cane mulch, then a layer of compost, and finally a bit more sugar mulch on top. We'd been progressively watering in the heap as we went. Fortunately, the weather decided to be helpful and just as we finished the final layer, the skies opened and we got a brief downpour. I still gave it a bit of Seasol after the rain for good measure.
The final step was to stake the bottom edge of the chicken wire and rig up a bit of plywood (re-cycled from the old dog kennel) as a gate. Voila! One potato patch.


Recap and lessons learnt
We didn't really have an idea of how much manure and straw we would need, but as it turned out we needed more than we got. Ideally, we would have liked to have had the heap at least 30cm deep, but it's probably more around 20-25cm deep. As we will need to keep adding to the heap as the potatoes poke up through the top, we're going to need to get much more straw and manure. Total depth will need to be 50-60cm.

While we like growing our own food for the joy of it and also to grow varieties you can't get commercially, we also like to look at the cost breakdown of growing our own vs buying from the local fruit & veg store. For reference, the rough costs:
  • 8 bags of cow manure - $44, will need more so add another 10 bags @ $55
  • 3 bales of sugar cane mulch - $36, will need more so add another 3 bales @ $36
  • 10m roll of chicken wire - $25
  • Seed potatoes - $22
  • Grow bags - $13

That's a total of ~$230. If we have good yields, that will be ~1kg per plant, so 30kg of spuds. Current spud prices are ~$2-3/kg for bog standard spuds, and ~$4-5 for "gourmet" varieties, so we could grow maybe $90-110 worth of spuds.

However, much of the costs are because we're starting a bed from scratch, which we won't need to do in future seasons as this bed will become part of the rotation. Next season, we will only need maybe 1/4-1/3 of the straw and manure and can use potatoes from this crop as seed tubers for the next (providing no diseases strike the patch). Next year, we could only be looking at ~$50 on materials for $90-110 worth of spuds. We're also not going to get varieties like the Royal Blue or Cranberry Red at the local fruit & veg.

In terms of time, the whole exercise took the two of us from around 10am to 3pm (with an hour break in the middle for lunch). The absence of digging meant that than heaviest labour was really moving the bags of manure and strewing them over the bed.

Thursday, September 17, 2009

Powdery mildew

I recently discovered that one of the snow peas was not looking very well. It's leaves had become yellow and mottled. Not knowing what it was, but guessing it was some kind of disease, I pulled the plant out hoping that it would save the other 5 snow peas from the same fate. A week later I could see that the neighbouring plants have developed odd white-ish spots on their leaves, with some of the lower leaves starting to yellow.

From reading some of our gardening books, I took a guess that this could be a fungal problem. A bit of googling later and I believe we have powdery mildew, which can affect plants like snow peas and is probably the result of my late afternoon watering, a few humid evenings and the way the lower parts of the snow peas are dense in foliage which restricts air movement.

I had a look for some organic options to deal with powdery mildew and found a few home remedies. The main one is a milk spray, which is 1 part full-cream milk to 10 parts water. Unfortunately, I didn't have any milk, so I decided to try another recipe, which used 7 teaspoons of bicarb soda, in a bucket of water with enough soap to make a lather. I mixed this up and put it in a little spray bottle.


The other advice on powdery mildew was to remove the worst affected parts of the plants. I removed most of the lower sections of the snow peas. This will also help air circulation around the plants. The lower halves looked a little naked, but I hope it will help. The rest of the foliage was sprayed with the bicarb & soap spray. I did this in the afternoon once the patch was in shade. I've also made a note to be careful watering in the afternoon. While I water at ground level, the spray tends to wet the bottom 10cm of the plant.


The other thing I did notice on the snow peas, which clued me in to the fact that it might be a fungal problem, was the presence of a number of yellow and black ladybirds. I remember from doing my first year biology bug project that these ladybirds feed on fungus. A quick look on the CSIRO entomology website and I found these little ladybirds are Illeis galbula and feed almost exclusively on powdery mildew. Definitely good bugs to have in your garden.

A few days later and the spray seems to have stopped the powdery mildew from worsening or spreading further. I think I'll leave the plants for a bit to see how they go and let the ladybirds feast on the remains.

Saturday, August 8, 2009

Operation Apple Orchard

Having received our five little apple trees a month or so ago, it was time we actually got them into the ground now that they're definitely dormant. We ordered a selection of dwarf varieties from Digger's Club which includes Rome Beauty, Snow, Jonathan, Gravenstein, and Vista Bella, which should mean that we have enough for cross pollination and a range of early through the late harvest.

Like all of our backyard garden projects, phase one involved lab-proofing the area where the new trees were going. We managed to pick up two lengths of wooden lattice from Whyte's Gully for $40. These were cut in half lengthwise to give us double the length and enough to fence off the bottom corner of the yard as a mini-orchard.

Next we planned out the spacing of the apple trees and dug the holes and put in a stack of clay breaker. After these had a few weeks to settle, we started work the last phase. The plan was to sheet mulch the ground of the orchard with newspaper and mulch to conserve water and also to give our new trees less competition from weeds and the ever invasive kikuyu. We had recently helped our neighbour seriously prune and remove some bottlebrushes that had gotten too big and were taking over his clothes line. All the prunings had been thrown through a chipper we hired so we had a nice big pile of mulch.

The clay breaker was struggling with our heavy clay soil, so we decided to backfill the holes with some "vegie soil" (leftovers from the load we bought to top up the vegie patch) and plant the apples into small mounds and built up the area in between them with mulch.

For each apple tree we made a small mound, hammered in a stake (made from branches pruned from other trees that had dried out), up-ended the trees from their pots, teased the roots a little, then spread them over the mound and covered with more soil until all the roots were firmly covered and there was a small "well" at the top of the mound. We trimmed the trees to 30cm about the graft, as per the instructions that came with them, and loosely tied them to the stakes with bits of old pantyhose. The trees were then watered in with some seaweed solution to help ease the transition.

The area in between we covered with wet newspapers. We had about three wheelbarrow loads (courtesy of my parents saving their newspapers, thanks!). It didn't quite cover the whole area, but was enough to start with. We then covered the newspapers with a thick layer of mulch. Later, once the newspaper and mulch have had a chance to rot down a bit, we're going to put in some ground cover plants between the trees.

The end result, as the Cunning Plans Dept put it, looked like some sticks, tied to some other sticks, surrounded by lots of little sticks, but come spring there will hopefully be some new green growth.

Wednesday, July 8, 2009

Bottled water vs tap water

I was listening to Triple J on the way home and Hack was doing a piece on the town of Bundanoon, which is just up on the highlands from us, and their plan to ban bottled water. And now it looks like the NSW Premier is following suite and phasing out the use of bottled water in NSW government departments and is planning a public campaign to discourage people from using bottled water.

I really support discouraging the use of bottled water if there is an easy to access supply of tap water. Our office tea room has always had a chilled filtered water spout for filling bottles and I would certainly prefer to fill up my glass for free as often as a like during the day than have to buy bottled water. I'm not sure if a ban is the way to go, but in the case of workplaces where it is fairly easy to install chilled filtered water fountains for staff use, then I think that's actually a nice policy that sets a good example.

I support encouraging people to drink water for both hydration and as a healthier alternative to soft drinks. I certainly don't like the unsustainable aspects of bottled water production. To me, it's excessive processing, packaging, and transport to provide something that for most people they can get for a fraction of the cost from the tap, and it hasn't had to travel anywhere near as far. I don't have as much of a problem with the concept of bottled water as essentially a boutique drink (i.e. you're purchasing the unique characteristics of water from a particular place) than I have with it being used as an alternative to perfectly acceptable tap water purely because of convenience. That is more typical of the "want it now" convenience attitude that disregards unsustainable processes and production in favour of something that requires little or no effort on the part of the consumer.

I think there are three main reasons that people drink bottled water:
  1. the tap water is not potable
  2. the tap water is drinkable, but you prefer the taste of bottled water
  3. you don't mind tap water, but when you're out, there aren't always convenient places to fill a bottle up or you don't have a bottle with you, so the only option is to buy water if you want to drink water instead of soft drink (probably because you're health conscious).
My guess is that in Australia, the biggest group would be the third lot, where the issue is more that of availability and convenience than a distinct aversion to tap water. I'm in the third group. I don't like soft drink. If we're traveling and I get thirsty, I'll buy bottled water. However, at home and work, I drink tap water. I also tend to have a bottle of tap water in the car with me. When that runs out, I buy bottled water and am often annoyed that I have to pay more for it than some sugar, colouring, and preservative loaded soft drink.

I think the key is providing an alternative. In cities that have perfectly drinkable tap water, providing places for people to fill up with filtered, chilled tap water, for minimal cost, is going to be the key to getting people to switch from bottled water. I think if the choice started to become available, most people would take the cheaper option over bottled water. Once that is set up, a ban is probably not necessary as the main consumers will be those people who are purchasing the water for its taste (same as someone would buy a bottle of coke because they like the taste) and those who are purchasing it because they don't have drinkable tap water.

I can see this becoming a bit like alternatives to plastic bags. It took a bit for the idea to take off, but once the major supermarkets started supplying "green bags" for purchase at the checkout it was easier to buy reusable bags, and then it is just getting into the habit of bringing the bags to the supermarket. The plastic bags are still there, but there are places that now charge for plastic bags (e.g. ALDI) and I don't think it will be long before paying for plastic bags is required. There will always be some people who will use plastic bags, and pay for them, because of the convenience factor (and we can glare disdainfully at them as we fill up our reusable green bags).

If you could convince major outlets like supermarkets, fast food chains, and service stations to have a filtered water refill station (for a small refill fee), then I think it won't take that long for people to get into the habit of having a reusable bottle with them. And if you can purchase a reusable bottle along with the refill, then that makes it all the more easier. Once a pattern is established it is a strong incentive for cafes and other stores that would normally stock bottled water to consider a filtered water fountain. Most office-type workplaces should also be able to provide filtered water without much difficulty. I would also love to see how the Bundanoon proposal of having filtered water fountains in the main street goes as that would be great if Councils could consider free filtered water fountains. Outdoors ones are probably targets for vandals, but perhaps having them in Council facilities such as swimming pools, libraries, halls etc.. would work.

I can also see the reusable bottles being a great marketing tool and potential fashion item, as it would be easy for companies to come up with funky designs. Just look at all the "green" bags out there that are used to promote all kinds of things and also as trendy fashion statements.

So I think this idea has merit and it certainly has my support. I look forward to seeing how Bundanoon go with their proposal and the proposed public campaign that the Premier has suggested.

    Monday, June 8, 2009

    One man's trash is another's treasure

    While we were out and about today we decided to pop into Whyte's Gully, the local resource recovery centre (aka the tip). We weren't looking for anything in particular, more just seeing if something would inspire us.

    We did score two relatively long lengths of wooden lattice fencing (capped on all edges), which will go towards vegie patch fencing for $40. Also spotted a pile of 34cm square floor tiles, in a white/offwhite colour. We've been meaning to replace the floor of the ensuite bathroom and at $1 a tile, these were a bargain. We took all 40 of them. We'll probably only need around 15 for the ensuite, but we could then do the floor of the toilet to match.

    Normally I skip past the various homewares as they're usually broken or otherwise no longer useful for their original purpose. However I stopped a large punchbowl was sitting on a table. It had the cups all piled in the middle and was half full of rainwater and various muck. I started taking the cups out and they all looked in good nick. The little plastic hooks that allow the cups to hang from the bowl were also there. The bowl itself looked fine and had a matching smaller bowl inside it. As I emptied it there was broken glass in the bottom, but not from anything from the set. I'm pretty sure it is identical to a set my Mum has. So for nostalgia sake I thought I'd take it home. We asked the guy how much and he said it had been sitting their for so long that we could take it for free! Score!
    We got it home and gave it a clean up. All the glass is in good condition. No cracks or chips. Only one of the little plastic hooks is missing. One cup has an interesting manufacturing defect were it is a bit wonky on one side. But all in all, a gorgeous set. And to think that someone took this to the tip! I mean, I can understand taking stuff to the Salvos when it goes out of fashion or selling it on eBay, but the tip? The stuff people throw out continues to make me boggle. Still, I've gotten a gorgeous punchbowl set for free so I'm calling that a win for today.

    Monday, June 1, 2009

    Waste Not! What to do with excess produce

    On Saturday, we went to the Waste Not! Vegie Swap held at the Wollongong PCYC Community Garden. It was our first time and the second time it's been run locally. We first read about it at Happy Earth and thought "what a fantastic idea". One of the things we've realised through our gardening adventures is that you tend to get a glut of produce and there is only so much you can eat, preserve, freeze, and offload to unsuspecting friends and relatives. Sadly our vegie patch didn't have a whole lot in it right now that's ready to harvest, except for the abundance of basil. However, we were interested in seeing what it was all about so armed with many bundles of basil, and some rosemary and thyme thrown in for variety, we headed over.

    There seemed to be a reasonable turn out, despite the chill in the air and the intermittant drizzle. There was an interesting selection of produce that people brought along to share. The swap arrangement was pretty relaxed. We picked up some bush limes, brazilian tree cherries, tumeric, a lettuce seedling, and some cucumber seeds. But most of all, we had a lovely time meeting the people there and having a look at the community garden. There was also coffee and freshly baked bread courtesy of the Port Kembla Mens club.

    We'll definitely be back, even if we don't have much in the garden. We're also hoping to get along to some of the community garden working bees to learn some more about gardening from the old hands.


    Green comfort

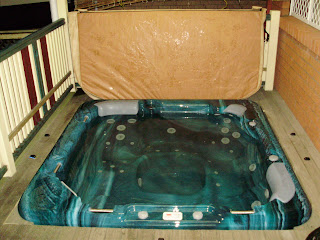
    We decided a while ago that a spa was not only a cool thing to have but would help with some health maintenance issues. Fortunately a spell of intense work provided the funds for it and after some back-verandah-meets-chainsaw action, we have a spa sunk into the back deck. How decadent. Now for the green accounting side of it:

    • New timber for deck mods - locally treated waxwood from plantation timber.
    • Spa itself - australian manufactured with exception of pump and electronics
    • Support pedestal - spare bricks and a paver lying around the house plus 1 bag of mortar
    • Water - 1500L from our rainwater tank
    • Heating - Currently electric system using 100% Greenpower from JackGreen.
    The first heat-up took a whopping 77kWhrs of electricity, which is more than a week's worth of our normal power consumption, or in other terms, enough to run the fridge for 2-1/2 months. Holding it at 34degC overnight took 13kWhr and for the daytime 6kWhr (outside temp a rainy 8~16 degC).

    As the fibreglass body only has a ~3mm coating of expanded foam coating as insulation, I stapled some sheets of plastic to the underside of the edge supporting timbers and pulled them all together. While I was doing this it was noticeable how warm the air was under the enclosed but not sealed deck. After the plastic was installed it was noticeable the temperature difference inside and outside the plastic, so it appears to be working. I also took the time to seal the corners where the curved spa sits in the square framed deck, as it was possible to feel the hot air rising from these small gaps. In time I'll put some thermometers around to measure exactly what's going on and how much effect it's having.

    Ultimately I hope to majorly reduce the power consumption by connecting to a solar tube water heater which I picked up at 50% off while buying some tanks. This will get plumbed in as a recirculating closed loop system to provide heat to the spa, via a heat exchanger (as soon as I find or make one!)

    So who says going green rules out some of the nicer things in life?

    Oh, and I may tap some of the water off to spoil the dogs with hydronic floor heating for winter...

    Wednesday, May 13, 2009

    The war on slugs

    Just when I thought our vegie patch was rather blessedly free of garden pests, we have had an invasion of slugs and the rotten buggers have targetted our strawberry patch.

    Around a month ago, one of our strawberry plants started to fruit prolifically, producing what looked like they would be big luscious fruit. Then to our great disappointment, just as the fruit was ready to pick, we'd discover that some rotten little pest had gotten to it first! At first we couldn't see any traces of the culprit and suspected birds, but then we found the tell tale silvery trails.

    First we tried pouring coffee grounds around the patch, having read that the caffeine is enough to make slugs and snails keel over. That didn't seem to deter them though, so onto plan B - Beer!

    We decided to try two different traps. One is the standard chinese container buried to ground level. The other the CPD came up with, which uses a cranberry juice bottle that is partially buried with an openning cut into the side. This one has the advantage of being relatively rain proof. That night, the CPD decided a spotlighting mission was in order to check the effectiveness of the traps.
    The mission uncovered slugs that were indeed going for the beer...having a drink and then crawling back out! The beer was about a day old by this point so the CPD tried some fresh VB, which seemed to have the desired effect (i.e. slugs turning themselves inside out). So, mission accomplished, the CPD packed up the spotlight and headed back the house...and forgot to close the gate to the vegie patch, leaving it open for our two beer-loving puppies.

    The next morning, there was no beer, no traps, no slugs, and worst of all, no strawberries! After all of that we've decided that a few spotlight missions and two bricks will do just fine for slug control.

    Sunday, March 22, 2009

    Hey Pesto!

    Since the last update, the vegie patch mk II has been going well. The strawberries, tomatoes, capsicums and basil have all taken off. Even the parsley I thought had surely fried to a crisp on those hot summer days is making a comeback. Unfortunately the rainwater tank has run dry again so the patch is now dependant on my ability to lug the watering can up and down the yard.

    The most productive plants have been the basil. They are all around 50-60cm high and full of lush big green leaves. I keep pinching off the flowers to spot them going to seed too early. And what does one do with an abundance of basil? One makes pesto, of course!

    Phase 1 - Collect basil
    There is something immensely satisfying about wandering into the garden with a basket and a pair of secateurs for a spot of harvesting. This collection made hardly a dint in the crop.

    Phase 2 - Mix with other fine ingredients
    Throw freshly picked basil in the food processor with some pine nuts, garlic, extra virgin olive oil and salt. Whizz to a coarse mush. Stir in some freshly grated parmesan cheese. Scoop into jars. Cover with a layer of olive oil.

    Phase 3 - Pesto!
    I now have three jars of home made pesto. I didn't use up all the basil I collected (there is only so much pesto one can use and my folks are blessed with equally productive basil plants so they don't need any). The leftovers will be destined for bruschetta or pizza. I'm looking forward to having some simple dinners of hot pasta with pesto stirred through.

    I'm really enjoying the harvest end of the gardening cycle. It's lovely to be able to eat fresh produce, straight from the garden. I've been enjoying our carrot crop, one carrot at a time. The rest get left in the ground until we're ready to eat them. The broccoli heads are getting to a reasonable size, albeit most of them are a tad mutated from pests getting to them.

    My fig tree (Black Genoa) arrived a week ago. Silly me didn't transplant it straight away so it started to look a bit poorly. I've now transplanted it into a bigger pot, but it still looks poor (mostly because all the leaves dropped off!). I picked up some Seasol from the nursery today and will give it a good feed tonight and hopefully it will rally. Should it survive my appalling mishandling of it, it should grow to be a lovely bush with lovely plump juicy figs. It's staying in a pot as I don't want to end up with a 10+ metre high monster.

    I've also ordered five apple trees and a cherry tree from Digger's club (I should really not be allowed near their catalogues). They're all on dwarf root stock so they won't get huge. They should arrive in a few months (Digger's only ships them when they're dormant to minimise damage). The local nursery has a good range of citrus and other fruit trees so there will be lemons, limes, mandarins, mangoes and whatever else looks good coming as well.